TM 5-6115-590-12
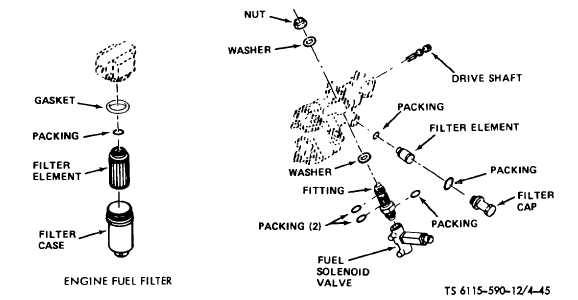
Figure 4-45. Engine Fuel Filter, Fuel Solenoid Valve and Fuel Control Unit Filter Replacement.
b.
Cleaning and Inspection.
(1) Wash parts with an approved cleaning
solvent and dry thoroughly with filtered compressed air.
(2) Visually inspect filter case for corrosion,
cracks, damaged threads or evidence of other obvious
damage.
c.
Installation. Dip replacement filter element in oil
(Military Specification MIL-0-6081 grade 1005 or 1010)
and install filter element with new packing and gasket in
reverse order of removal. Tighten filter case securely
but do not overtorque.
4-79.
Fuel Solenoid Valve
a.
Removal.
(1) Without removing fuel control unit from the
engine, disconnect wiring harness connector and tube
assembly from fuel solenoid valve (fig. 4-45).
(2) Remove nut and washer securing fitting to
fuel control unit; remove solenoid valve, fitting and
washer.
(3) Remove
fitting
from
solenoid
valve.
Remove and discard packings.
b.
Cleaning and Inspection.
(1) Wipe solenoid valve with a clean rag
moistened with an approved cleaning solvent and allow
to dry.
(2) Inspect valve for cracks, breaks, or other
damage. Inspect electrical connector for bent pins,
stripped threads or other damage.
c.
Test. Connect a 24V DC power source to
terminals A and B of the solenoid coil. If solenoid does
not actuate when power is applied, replace solenoid
valve.
d.
Installation. Install satisfactory or replacement
fuel solenoid valve in reverse order of removal using
new packings.
4-80.
Oil Pump Assembly
a.
Removal.
(1) Remove all tube assemblies from oil pump
assembly (fig. 4-46) and wiring harness connectors from
tach-generator and oil temperature bulb.
(2) Remove three attaching bolts and washers
and carefully remove oil pump assembly and packings,
with attached components from engine in a straight line.
Discard packing.
(3) Remove tach-generator from oil pump
assembly by removing four attaching nuts and washers.
Reconnect wiring harness connectors to oil temperature
bulb and tach-generator.
4-81.
Oil Temperature Bulb
a.
Removal. Without removing the oil pump
assembly from the engine, remove wiring harness
connector from oil temperature bulb (fig. 4-46). Unscrew
and remove oil temperature bulb and gasket from oil
pump assembly. Discard gasket.
b.
Cleaning and Inspection.
(1) Clean oil temperature bulb with an approved
cleaning solvent and dry thoroughly with filtered
compressed air.
(2) Visually inspect oil temperature bulb for
cracks, corrosion, abrasion, damaged threads, or other
evidence of damage.
c.
Installation. Install satisfactory or replacement oil
temperature bulb on oil pump assembly
4-101