TM 55-2835-208-23
2-31 REMOVE COMPRESSOR FITTING ASSEMBLY (Continued)
2-31
1.
2.
3 .
4.
5.
6.
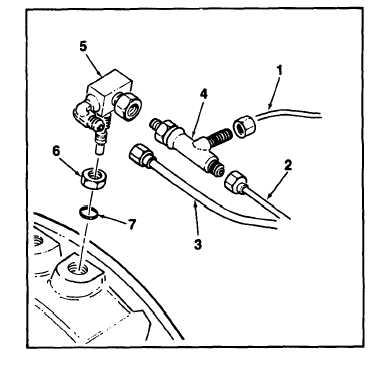
Place a cloth (E13) below con-
nection to absorb dripped fuel
when disconnecting tube assem-
b l i e s ( l ) ,
(2)
and
(3)
and
purge valve assembly (4).
Handle tube assemblies
carefully when dis-
connecting.
Tube
assemblies are easily
bent or kinked.
Remove
lockwire
(E16)
from
f i t t i n g a s s e m b l y n u t ( 5 ) a n d
d i s c a r d.
Disconnect
tube
assemblies
( l ) ,
(2) and (3).
Unscrew
purge
valve
assembly
(4)
from
compressor
f i t t i n g
assembly (5).
Loosen jam nut (6) and remove
compressor
f i t t i n g
assembly
( 5 ) .
Remove and discard packing (7).
FOLLOW-ON MAINTENANCE:
None
END OF TASK
2-62

